How to Install an Epson Printer: Step-by-Step Setup Guide for a Smooth Start!
When you’re setting up a new printer, it’s not hard and shouldn’t cause any stress. Opening the box and seeing cords, cartridges, and installation instructions may make you feel confused. If you’re looking for straightforward step-by-step directions to help you install your Epson printer, you’ve come to the right place! Epson printers are designed with user convenience in mind, whether for home, office, or professional use. If you follow these steps in order, you will be able to install your printer quickly without making any common mistakes. This will be your complete guide to unboxing, setting up the printer’s hardware, installing drivers, connecting wirelessly, and testing. By following these guidelines, you should be able to get quality prints from your Epson printer in no time at all.
Unboxing and Preparing Your Printer
Open the Epson printer box and remove all the items inside the box. The box will generally have the printer unit, power cord, ink cartridges, manual, setup CD, etc. Remove any tape or plastic from the printer. Many issues will arise due to the shipping materials still being inside the printer. Place the printer on a level surface near a power outlet. If you are using wireless (WiFi) printing, make sure that it is in range of the wireless router. If the printer is properly located, there will be air circulation around it, and you will have better access for paper and ink refills after you set it up.
Connecting the Power and Initial Setup
Plug the power cord into the back of the printer and into a wall outlet (preferably, the wall). Do NOT use an unreliable or unstable extension cord if possible. Press the power button, and the printer will start to power on. The printer will also have some internal motions as it gets ready to print; this is totally normal. Follow the guided steps on the printer control panel to complete the initial setup, including selecting a default language and region. Unless specifically directed to by the printer setup manual, do NOT connect the USB cable to the printer until the setup is complete.
Installing Ink Cartridges Correctly
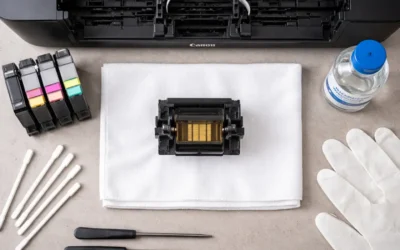
Ink installation must be done carefully to ensure proper printing performance. The instructions provided in your User Guide should be followed when opening the ink compartment. Each cartridge must be removed from its packaging and not touched on the copper contacts or nozzles of the ink. Each cartridge must be inserted into the appropriate colour slot until it clicks and is seated securely. After the ink compartment has been closed, the printer will initialise the ink system. This may take multiple minutes. Turning off your printer during ink charging will cause an interruption in the proper setup of the printer.
Loading Paper the Right Way
Proper paper loading prevents printing errors and paper jams. Follow these simple steps:
- Pull out the paper tray gently.
- Adjust the side guides to match your paper size.
- Insert clean, aligned paper without bending it.
- Set the correct paper size in the printer menu.
Matching the physical paper size with the printer settings ensures accurate and smooth printing from the beginning.
Downloading and Installing Epson Drivers
The proper installation of Epson printer drivers is an integral aspect of successfully using an Epson printer. Printer driver software enables communication between printers and computers. To find the right Epson printer drivers, begin by visiting the Epson website and searching by model. Once you have located your printer, select it, and download the recommended driver package for your operating system (Windows or Macintosh). After you have downloaded the driver package, run it, and follow the instructions on-screen. You will be prompted at some point during the setup to choose between wired (USB) or wireless options. Choose your connection type, and proceed with the setup. Using updated driver software will help ensure that you get the best possible performance from your Epson printer, as well as access to many of the advanced features of your printer.
Setting Up Wireless Connection
Wireless printing offers flexibility and convenience, especially in homes and offices with multiple devices. To connect your printer to Wi-Fi:
- Go to the printer’s control panel.
- Open network or Wi-Fi settings.
- Select your wireless network from the list.
- Enter your Wi-Fi password carefully.
Once connected, your computer should detect the printer automatically during driver installation. Some Epson models also support WPS connection, allowing quick pairing through your router. After a successful connection, print a test page to confirm everything is working correctly.
Installing on Windows and macOS
For Windows users, go to Settings -> Printers and Scanners and select ‘Add a New Printer or Scanner’ if you want to add a printer or scanner. If your Epson printer does not appear in the list of detectable devices, manually open the driver file you downloaded. You may need to restart your computer.
For Mac computers, open System Preferences -> Printers and Scanners, then click the ‘+’ to add your Epson printer or scanner. Select it from the available devices. If your Epson printer does not appear, make sure that it and your Mac are both on the same Wi-Fi network. Install official drivers for the best experience and full features.
Testing and Calibrating the Printer
After installing the printer, it’s good to perform a test print to verify everything is set up correctly. You will do this from your computer settings. The output should have clear letters/words, nice, balanced colours and should be printed on a ‘line’. If you notice any streaks or irregularities while printing, use your printer maintenance functions for head cleaning or head alignment. Calibration will improve the quality of your output and help prevent any problems in the long run.
Common Installation Problems and Solutions
Sometimes small issues can appear during setup. Here are common problems and practical solutions:
- Printer not detected: Check cables or Wi-Fi connection and restart both devices.
- Driver installation error: Download the latest driver version and temporarily disable antivirus software.
- Poor print quality: Run nozzle check and head cleaning functions.
- Paper jam message: Remove jammed paper carefully and reload properly aligned sheets.
Most installation challenges are minor and can be resolved quickly with careful troubleshooting.
Maintenance Tips After Setup
Once you understand how to install an Epson printer successfully, regular maintenance keeps it running smoothly. One of the easiest ways to ensure maximum performance out of your printer is to keep the firmware updated. Using genuine Epson inks will provide the best print quality possible from your printer. Do not allow an Epson printer to sit for an extended period of time without being used because dried inks can cause the print heads to become clogged. Cleaning and dusting the exterior of the printer with a soft cloth will also help extend the life of the printer and increase its printing consistency.
Conclusion
If you know how to install an Epson Printer correctly, then you will have a good start to your printing experience. Each phase of the process of setting up the printer, including unboxing, installing the ink cartridges, downloading the drivers and configuring your wireless network, plays an important part in producing reliable output. Taking your time to do each phase properly will prevent future technical issues and also help to ensure you get high-quality printed materials. No matter where you set up an Epson printer (at home, school or work) if you follow the steps laid out above, setting up an Epson printer will be a relatively simple process. Since you have correctly set your printer up, you can complete all future maintenance activities as well. This will give you years of productive and professional-looking output from your Epson printer.
Frequently Asked Questions
1. Can I install my Epson printer without a CD?
Yes, you can download the latest drivers directly from the Epson website.
2. Why is my Epson printer not connecting to Wi-Fi?
Check your Wi-Fi password, ensure a strong signal strength, and restart your router and printer.
3. How long does ink initialisation take?
It usually takes a few minutes. Do not turn off the printer during this process.
4. Should I use a USB or a wireless connection?
Wireless is convenient for multiple devices, while USB provides a stable direct connection.
5. What should I do if my computer cannot detect the printer?
Reinstall the drivers, check connections, and ensure both devices are on the same network.