
Written By Tenaui Middle East
2021-08-29
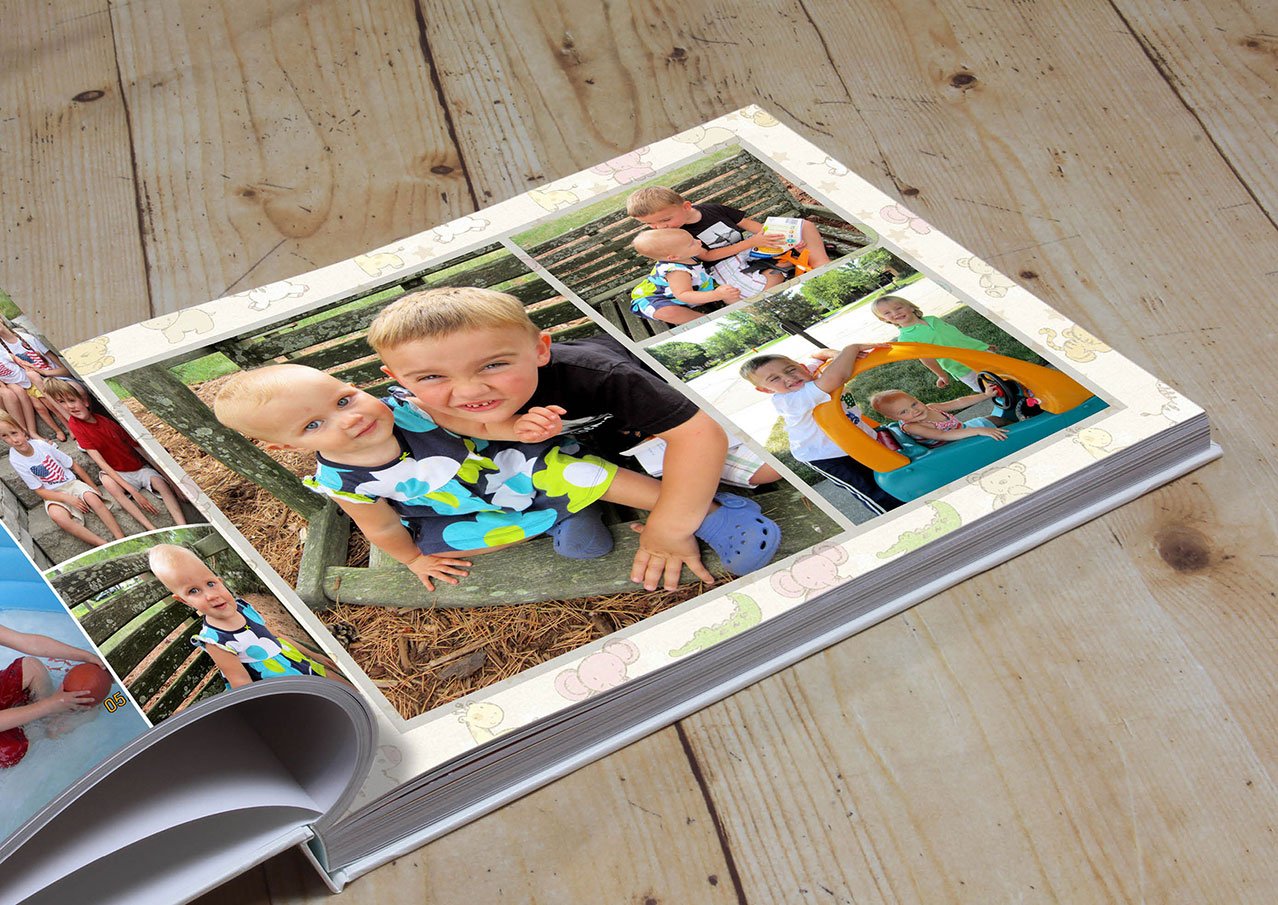
Album Making Machine | Album Printers
Your life is high definition. Digital pictures can be shared in a matter of seconds, but nothing beats having a Photo printer photography in your hands. So why not make yourself a high-quality photo album?
A professionally printed and bound customized photo album printer will bring your images to life, help you cherish your memories, and make a great present for friends and family.
It’s now simpler than ever to print your work, whether it’s work prints, exhibition prints, or high volume on-location printing, thanks to the availability of inexpensive professional-quality photo printers, many of which have more accessible capabilities.
We’ll talk about the finest photo album printer and its work in this article. These photo-making machines are intended to generate realistic, vivid pictures easily from home, whether you’re a professional photographer or want high-quality photographs to display.
Which Printer Is Best For Photo Album Printing And Why:
Various brands are available in the market that offers their photo album printers, but canon is a top brand in the printing world.
That’s why, in this article, we will discuss all the important features, functions, and printing technology of the Canon PIXMA PRO-100 Photo Printers.
Professional Photo Printing With A Resolution Of Up To 13” X 19” Is Available
It’s time to upgrade to the large-format, high-quality printer you’ve always wanted. The Canon PIXMA PRO-100 Wireless1 Professional Inkjet Printer has the features and technology you need to produce high-quality prints that match the photos you capture.
You can print an image up to 13” X 19” that makes it perfect in the category of photo album printers.
Professional Quality, Built-in:
Canon FINE (Full-photolithography Inkjet Nozzle Engineering) is a patented print head that allows printing with tiny droplets and high resolution up to 4800 x 2400 dpi4.
True Monochrome Prints:
Gray, Black, and Light Gray are the three monochrome inks included in the 8-ink ChromaLife 100+ system3. When generating the dramatic expression of grayscale photography, these inks provide increased, deep black density to raise your level of professional print quality.
Optimal Color Analysis and Mixture:
The Optimum Image Generating (OIG) System combines two important technologies originally seen in the PIXMA PRO-1. The first is a smart ink mixing balance derived from a variety of ink mixtures and sophisticated analysis.
The OIG System examines several picture variables such as color reproduction, tonal gradations, black density, low graininess, glossiness, anti-bronzing, and anti-metamerism while calculating the optimum outcomes for each print mode and printer paper type utilized.
Canon’s experience in image technology and the standard colors of life that people see and recall daily develop these key ink balance principles.
The second is color reproduction, tonal gradations, and consistent glossiness balancing. When your photo is printed, presented, and viewed the same as you envisioned it, the genius and power of the OIG System are fully demonstrated.
Pro Printing:
Professional photographers may use the sophisticated Print Studio Pro plug-in software to create effective printing solutions and immediately transfer picture data. Digital Photo Professional (version 2.1 or later), Adobe Photoshop CS, Adobe Photoshop Elements, and Adobe Photoshop Lightroom are all compatible with Print Studio Pro.
Printing from CDs and DVDs is built-in:
Print directly onto your printable CD, DVD, or Blu-ray Discs and jackets for a more convenient experience.
Built-in Wi-Fi:
The built-in Wi-Fi allows you to install the printer anywhere you want and allows multiple users to print from various PCs simultaneously.

The procedure to Setup WPS Connection
Before we get started, there are a few requirements for using the WPS push button method:
- A physical WPS push button must be available on the access point. For further information, consult the user handbook for your device. If you don’t have access to a WPS push button, follow the Standard Connection Method section instructions.
- The WPA (Wi-Fi Protected Access) or WPA security protocol must be used on your network. The majority of WPS-enabled access points use this protocol.
Step 1:
- Check and see whether the printer is turn on.
- For a few seconds, press and hold the [Wi-Fi ] button on the front of the printer.
Step 2:
Once this button has begun to flash blue, go to your access point and hit the [WPS] button within 2 minutes. Please refer to the access point documentation for specific instructions on how to push the WPS button.
Network settings confirmation
If you want to double-check that your Photo printer is link to your wireless network, print out the network settings for your printer:
- Make sure your printer is turn on.
- Fill an A4 or Letter-sized sheet with plain paper.
- Hold down the [Resume/Cancel ] button until the power lamp flashes six times, then let go. The information page for the network will be printed.
Check that the “Connection” displays “Active” and that the SSID – Service Set Identifier (the name of your wireless network) indicates the proper name of your wireless network when referring to the printout.
The WPS setup procedure is now complete.
Ethernet connection built-in:
Numerous users may print simultaneously from multiple networked PCs in any scenario, thanks to the built-in Ethernet connection.
Printing without a computer:
You may print photographs straight from a suitable digital camera, DV camcorder, or camera phone via a PictBridge connection.
Hi-Speed USB:
Connect the wire to your computer for a lightning-fast data transfer.
The procedure to Setup USB Connection
Step 1:
- Run the setup on the CD that comes with your printer. If the “Setup CD-ROM” does not allow autorun, click [My Computer], select the CD-ROM, and double-click [MSETUP4.EXE].
Please download the software and manual if you do not have the installation CD with your product.
- Click [Next] when the main screen appears.
Please note that some models with a wired network connection may have an additional page that asks you to choose between a USB and a network connection. Please choose [Network Connection] if you see this screen.
- As a connection method, choose [Wireless Connection].
- Ensure your printer is turned on and that the power bulb is turned on before clicking [Next].
Step 2:
- You should click on the button [Connect to the network].
- When the [Wireless Setup Using the USB Cable] screen displays, choose it.
- Select your region and then click [Next] when the next screen appears.
- When the following screen displays, choose your region and then click [Next].
- When the following page displays, click [Next] after selecting the software you want to install. Don’t worry if you’re not sure whatever software you want to install at this point; you can easily uninstall it later if you change your mind.
- To accept/agree to the end user licensing agreement, click [Yes] on the next screen.
- Click [Next] when the following screen appears.
Step 3:
Connect your printer to your computer using the provided USB cable when the following screen appears. The connection on this cable has the symbol.
The following screen will show after your printer has been recognized. The name of the access point to which your computer is connect will be show. If you wish your printer to join this wireless network, choose [Yes].
Disconnect your printer from your computer and click [Next] when the following screen appears.
Your printer model and wireless network name (or SSID) are display on the following screen.
AirPrint:
Allows you to print photographs, emails, Web pages, and documents directly to your printer from your Apple device without the need to install a driver.
Conclusion
The battle for the title of finest photo printers is mainly between two names: Canon and Epson. But Canon PIXMA PRO-100 is a top-ranking photo printer due to its advanced features.
While there are other portable photo-making machines, these two are the only game in town for high-quality desktop printers. It is the place to go if you want to frame, mount, or display your photographs.


